How to Export Orange Mail to PST File Format?

Searching for a way to export emails is not new, and Orange Mail is no exception. There are several reasons that prompt users to export Orange Mail to PST file format. Undoubtedly, Orange Mail is one of the most commonly used email services among users. However, taking a backup of Orange Mail emails into PST format is a logical step in many situations.
In this blog, we will discuss the reasons to back up the Orange Mail mailbox and the different methods to do so. Additionally, we will explain the complete process to export emails from Orange Mail to PST using tried and tested solutions.
Why Do Users Need to Export Orange Mail to PST File Format?
Orange Mail provides a good email platform, but Outlook offers a more advanced and secure working environment. This is one of the primary reasons users switch from Orange Mail to Outlook. However, there are several other reasons why users want to export Orange Mail emails to PST files:
- To prevent accidental deletion or data loss from the Orange Mail server keep a secure local backup.
- Outlook allows users to add passwords to PST files, ensuring better security and restricted access.
- With Exchange Server support, Outlook enables offline access to emails even without an internet connection.
- PST files can be easily archived and stored on external drives for future reference.
- Organizations often require PST files for compliance and legal purposes.
So, these are some common reasons to understand why exporting Orange Mail to PST is necessary. When you want to access emails in Outlook, they must be stored in PST format.
Now, let’s explore the methods to export Orange Mail emails to PST files.
How to Export Emails from Orange Mail to PST File Manually?
To manually export Orange Mail emails to PST format, first configure your Orange Mail account in Outlook using IMAP settings, then use the Import/Export feature to create the PST file.
Follow the steps below:
1. Open the Outlook application on your system.
2. Click on the File tab and select Account Settings.
3. Click New to add a new account.
4. Choose Manual setup or Additional server types, then click Next.
5. Select IMAP as the account type.
6. Enter your Orange Mail account details, including email address & password etc.
7. Under the Outgoing Server tab, enable My outgoing server (SMTP) requires authentication.
8. In the Advanced tab, enter the port numbers: 993 for IMAP with SSL and 587 for SMTP with TLS.
9. Click OK, then click Finish to complete the account setup.
10. After successfully adding the Orange Mail account to Outlook:
11. Go to the File tab again.
12. Click Open & Export, then choose Import/Export.
13. Select Export to a file and click Next.
14. Choose Outlook Data File (.pst) and click Next.
15. Select the Orange Mail folder you want to export.
16. Click Browse to choose the location where you want to save the PST file.
17. Click Finish to begin exporting Orange Mail emails to PST format.
These are the complete manual steps to configure Orange Mail in Outlook and export emails to PST format. However, this method can be time-consuming and is not suitable for large or multiple mailboxes.
Why Manual Technique is Not a Good Option?
Although the manual method is free, it is not always the best solution. Some limitations include:
- You cannot export multiple Orange Mail accounts in bulk.
- Configuration errors may occur if any setting is incorrect.
- The process is time-consuming and requires technical knowledge.
- There is a risk of data loss if the process gets interrupted.
- No advanced filtering or scheduling options are available.
Due to these drawbacks, many users prefer an automated solution.
How to Convert Orange Mail into PST File Professionally?
To overcome all the limitations of the manual solution, try the Xtraxor on your Windows PC. The software is capable of converting all emails from Orange Mail to PST format in a single process. With this application, you do not need to install Outlook or configure any additional settings to save Orange Mail emails into PST format. It maintains 100% data integrity during the process and exports emails along with attachments and all other important attributes.
Click the free download button to explore all working steps.

Steps to Export Orange Mail to PST File Format
Step 1. Download and run the software on your system.
Step 2. Navigate to Open >> Email Accounts >> Add Account.
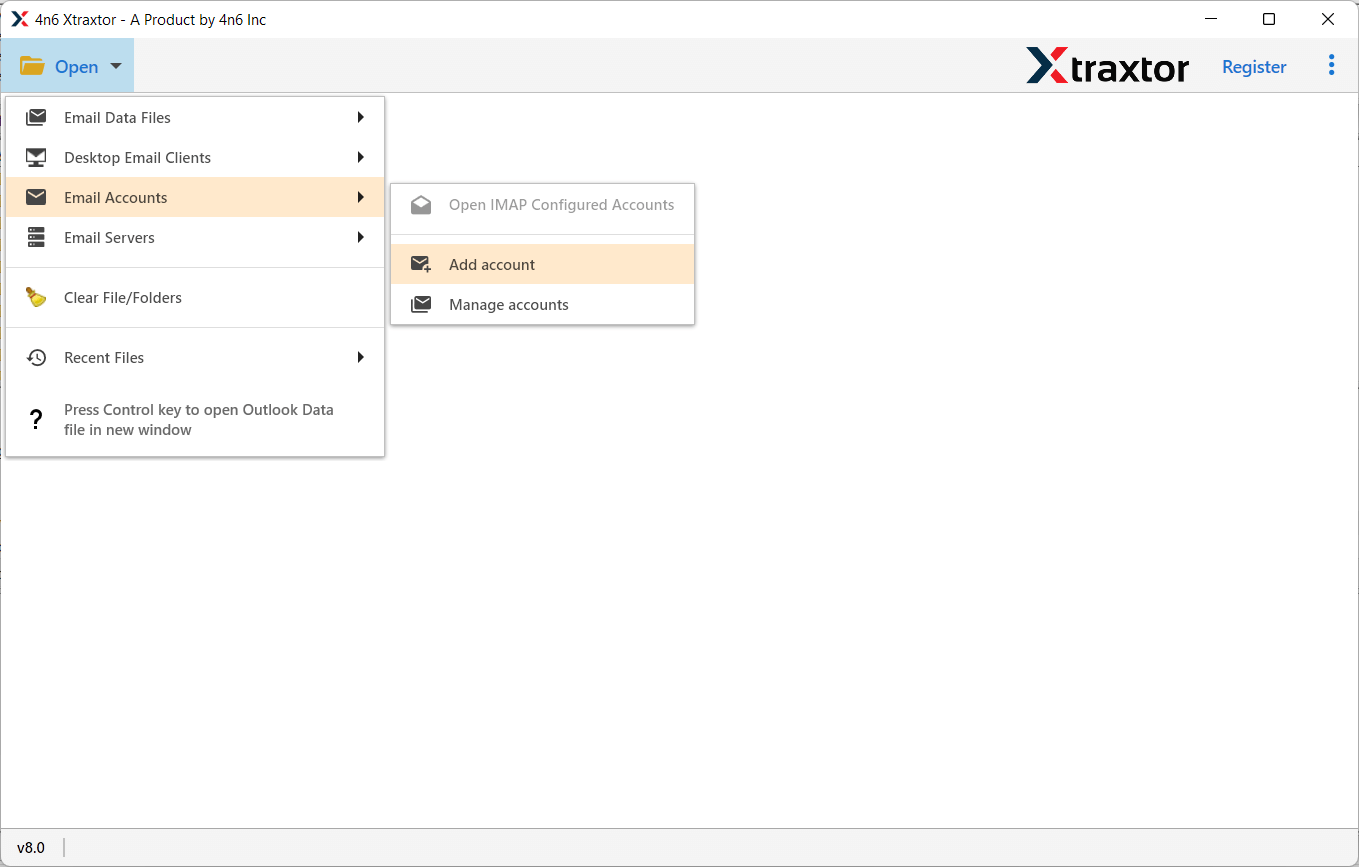
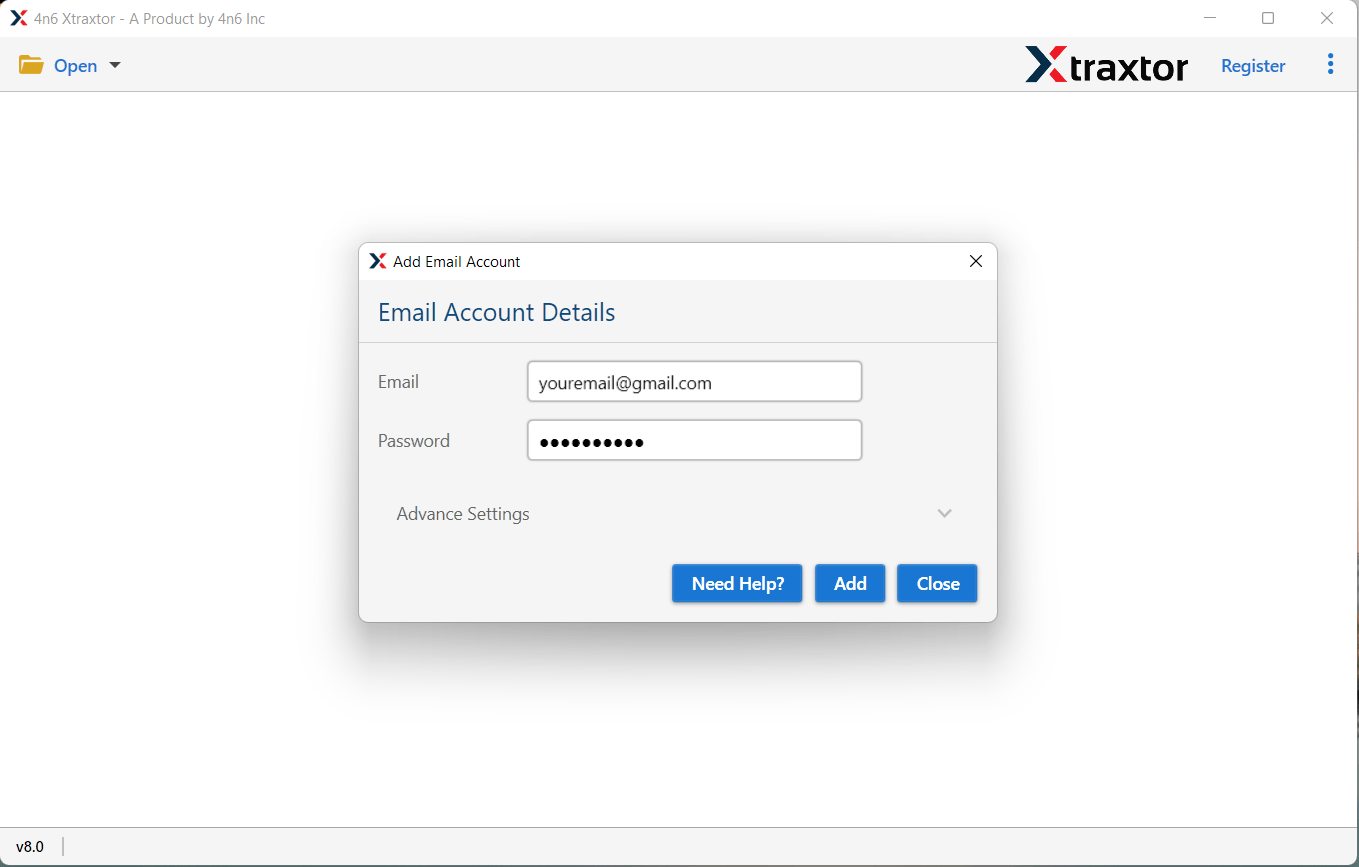
Step 3. Enter your Orange Mail login credentials and click on the Add button.
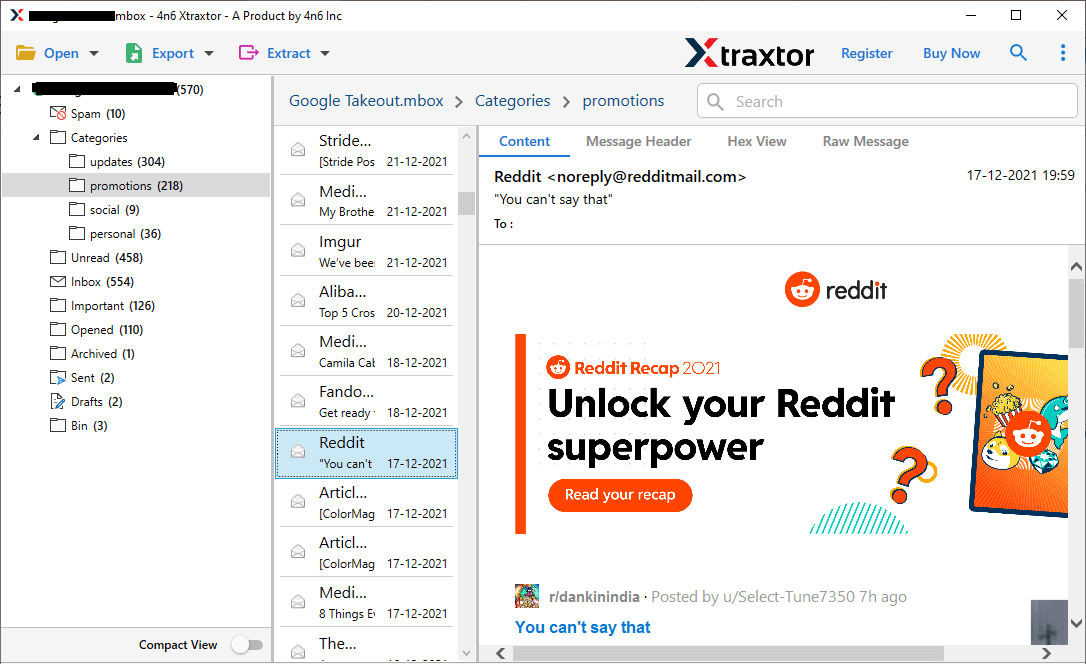
Step 4. The software will load all your mailbox data and provide a complete preview.
Step 5. Click on the Export option and select PST from the list of saving formats.
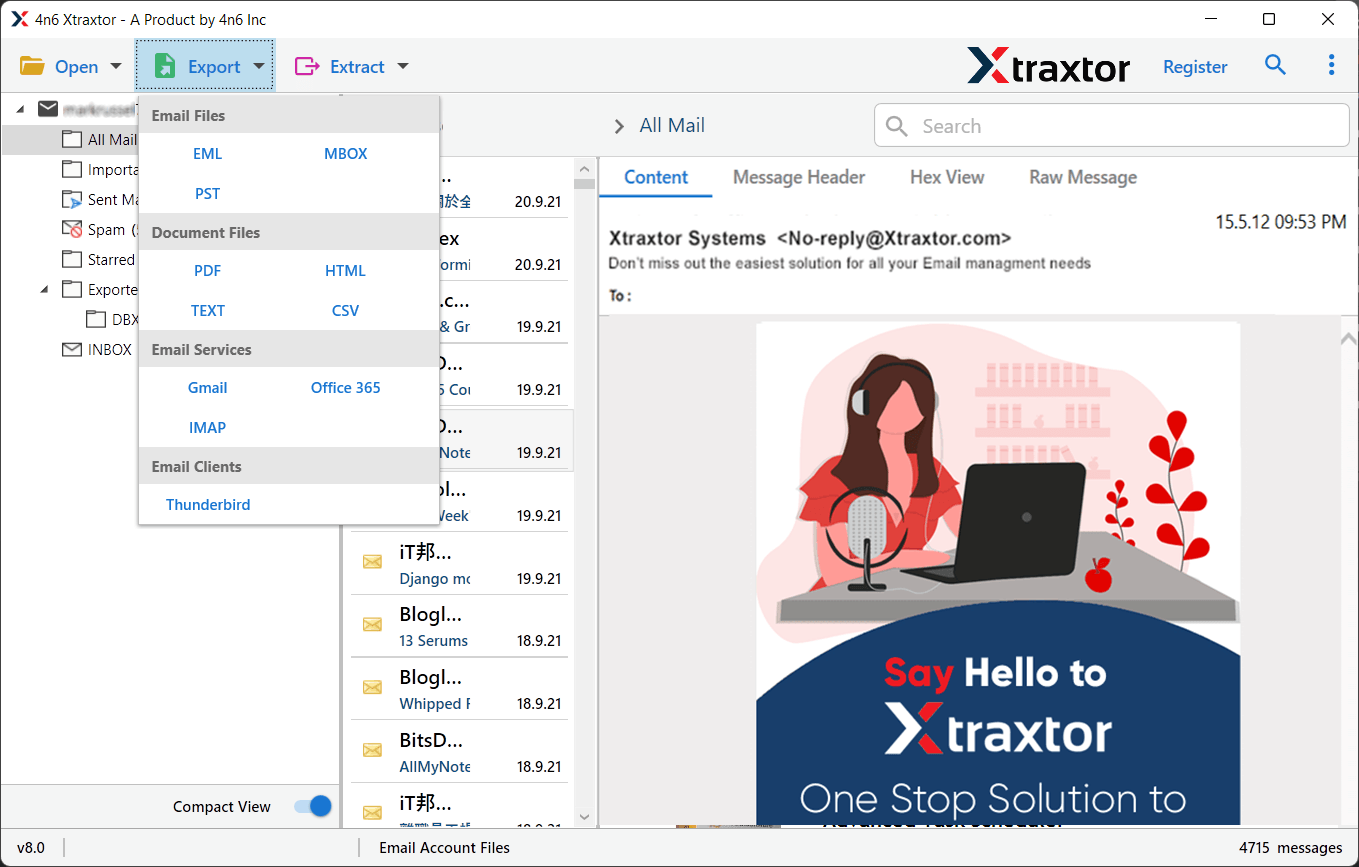
Step 6. Choose the Orange Mail folders that you want to convert into PST format.
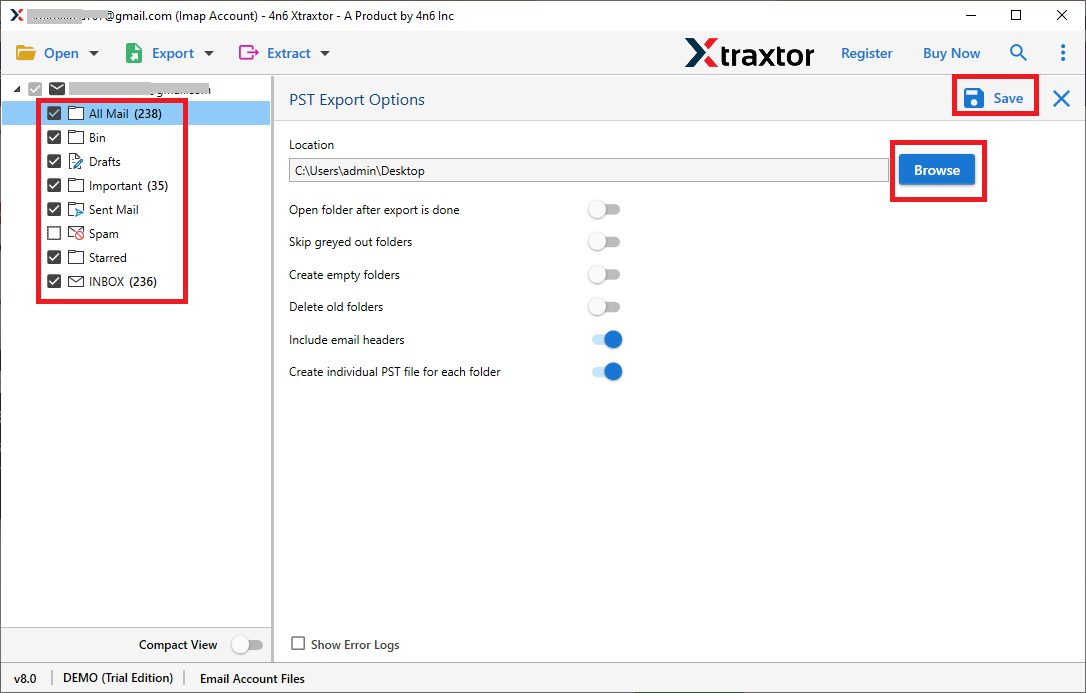
Step 7. Click on Browse to select the destination location and then click the Save button.
The tool exports Orange Mail emails to PST format along with attachments and preserves the original folder hierarchy throughout the process.
Conclusion
Although Orange Mail is a reliable email service, many users prefer Outlook for better security, offline access, and advanced features. In this article, we discussed two methods to export Orange Mail to PST file format. The manual method is free but lengthy and complex. On the other hand, the automated method is faster, safer, and more efficient.
If you are looking for a secure and hassle-free way to export Orange Mail emails to PST, using a professional tool is highly recommended.
