How to Export DreamHost Emails to PST File?

Summary: Are you looking for a solution to export DreamHost emails to PST file? If yes, then this blog will help you. Here, we will explain the best manual and professional methods to download DreamHost emails into PST format without any hassle. Just follow the steps carefully and complete the process easily.
Email communication plays an important role in both personal and professional work. Many users who have DreamHost email accounts often need to export their emails to PST format for backup, migration, or easy access in Outlook. However, most users are not aware of the correct method to do this.
Before we move to the process, let’s understand why users want to export DreamHost emails to PST file.
Why Export DreamHost Emails to PST File?
There are several benefits, such as –
- Backup and Archiving: Exporting emails to PST creates a secure backup on your system and protects data from loss.
- Outlook Access: PST files can be opened in Outlook, so you can easily view and manage your DreamHost emails.
- Offline Access: You can access your emails anytime without an internet connection.
- Easy Management: PST files help you manage large email data in a simple and organized way.
- Free Up Server Space: Moving emails to PST helps reduce mailbox size and improves performance.
- Data Migration: You can easily move DreamHost emails to another system or Outlook account.
- Long-Term Storage: PST files are useful for storing old emails safely for future use.
- Quick Search Option: Outlook allows you to quickly search emails within PST files.
- Data Safety: Keeping a local copy reduces the risk of losing important emails due to server issues.
Now that you know the reasons, let’s understand how to do it. We will explain two methods – the manual method and the automated solution.
How to Convert DreamHost Mailbox into PST Manually?
To manually export DreamHost emails, you need to configure your account in Outlook and then export the data. Follow the steps below:
- First, open Microsoft Outlook on your system.
- Go to File >> Add Account.
- Enter your DreamHost email credentials.
- Choose IMAP and enter server details provided by DreamHost.
- Click Next and wait for the mailbox to sync completely.
- After syncing, go to File >> Open & Export >> Import/Export.
- Select Export to a file and click Next.
- Choose Outlook Data File (.pst) and click Next.
- Select DreamHost mailbox folders that you want to export.
- Choose a destination path to save the PST file.
- Click Finish to start the export process.
Done! This is how you can manually export DreamHost emails to PST file.
However, this method has some limitations. It takes time, requires Outlook setup, and needs basic technical knowledge.
How to Export Emails from DreamHost to PST File in Bulk?
Try Xtraxtor software and export emails from DreamHost to PST file in a few simple clicks. The software allows you to export only selected emails or bulk emails into PST file. Also, you can specify your emails based on date, sender, subject, and more. Additionally, you can backup DreamHost emails to your computer or external storage device easily. Its simple interface helps users complete the export process without any difficulty.
Moreover, this tool also lets you convert DreamHost emails to various file formats and migrate them to other email services. The software works smoothly on Windows 11, 10, and all earlier versions.
Click on the free download link and try out the demo version at no cost.

Steps to Export DreamHost Emails to PST File
Step 1. Launch the tool on your system.
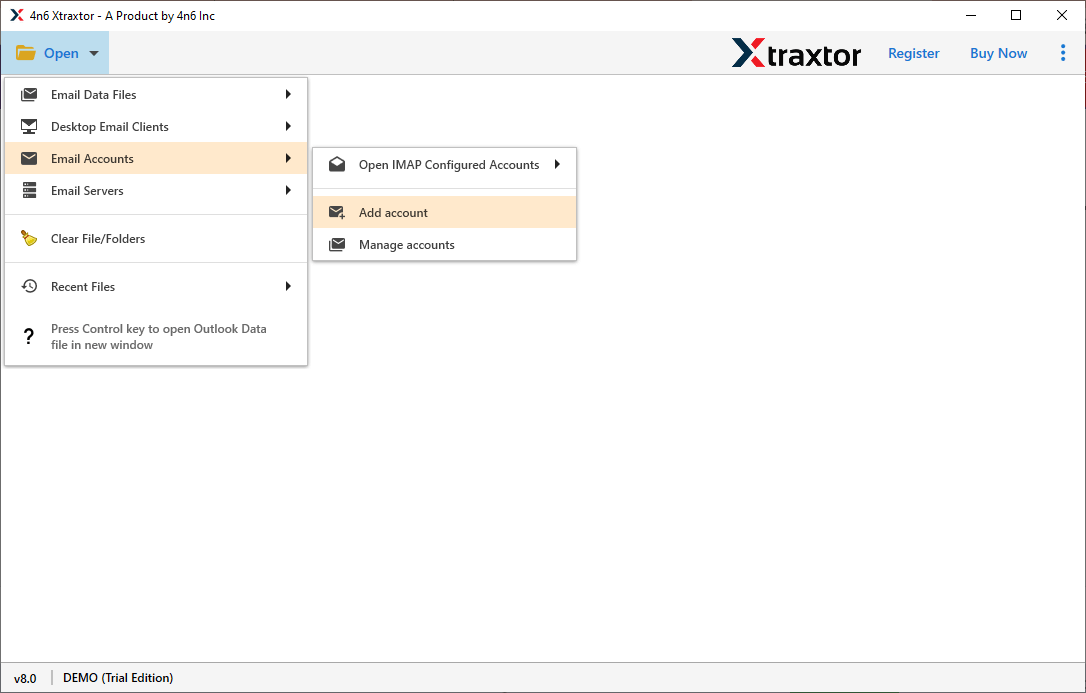
Step 2. Click on Open >> Email Accounts >> Add Account option.
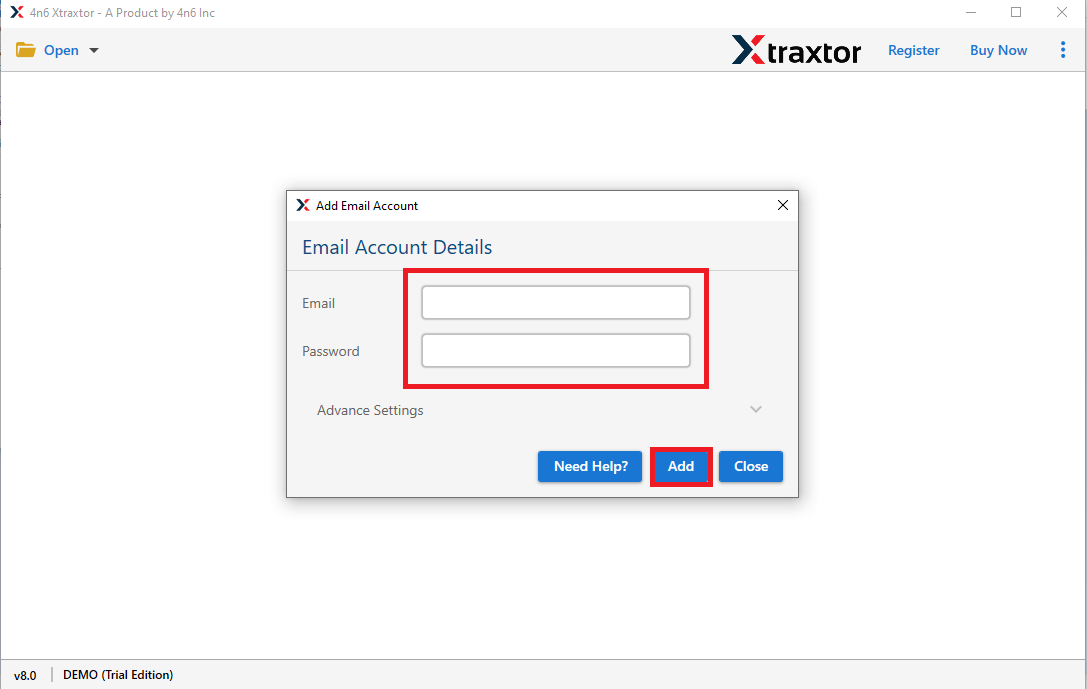
Step 3. Enter your DreamHost email login details and click on the Add button.
Step 4. Now, click on Export and choose PST as the saving format.

Step 5. Select the email folders that you want to export.
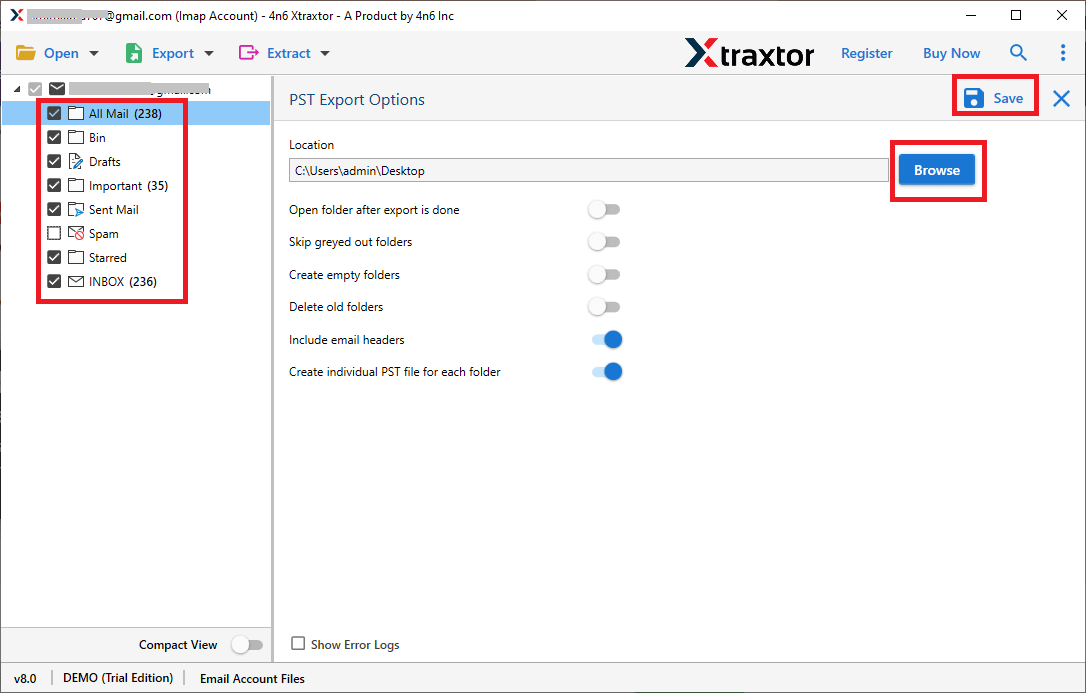
Step 6. Choose the destination location & click the save button to start.
Done! Your DreamHost emails are successfully exported into a PST file.
Why Choose Automated Software instead of Manual Methods?
This software offers many useful features, such as –
- Export DreamHost emails to PST along with attachments.
- Easy-to-use interface for all users.
- Advanced email filters (To, From, Subject, Date, etc.).
- Option to export selected email folders only.
- Maintains folder structure during export.
- Supports multiple saving formats like PST, MBOX, PDF, CSV, etc.
- Allows to migrate dreamhost to Gmail, Office 365, and other platforms.
- Works on all Windows versions.
- Free demo version available for testing.
Conclusion
In this blog, we discussed both manual and professional methods to export DreamHost emails to PST file. The manual method is useful but has several limitations, such as being time-consuming and requiring technical knowledge. On the other hand, the professional tool offers a faster and more reliable solution with advanced features. It makes the export process simple and smooth for all users. You can also try the free demo version to understand how the tool works before using the full version.
