If you’re looking to import EML files to Exchange Online (Office 365), you’re not alone. Many users need to import EML file data to the cloud for better accessibility, security, and collaboration. In this guide, we’ll walk you through simple and efficient method to import EML to Exchange Online with complete data.
Before we move ahead, let’s talk about the benefits of EML to Exchange Online migration.
Why Migrate EML to Exchange Mailbox?
EML files are commonly used by email clients like Windows Live Mail, Thunderbird, and others. However, as importing these EML files into Exchange Online in beneficial for may reasons such as:
- Centralised Email Management: Access all emails from a single platform.
- Enhanced Security: Benefit from Microsoft’s robust security features.
- Anywhere Access: Retrieve emails from any device, anywhere.
- Collaboration: Integrate with other Microsoft 365 tools for improved productivity.
How to Import EML Files to Exchange Online?
To instantly upload EML files to Exchange, use the Xtraxtor EML Converter tool on your Windows OS. The tool will directly import your EML files into Exchange Online mailbox without any hassle. Most importantly, the importing process will not affect your email’s key elements and attributes. You will find the exact replica of your EML file data in the Exchange mailbox with proper formatting.
Try out the demo version of the software to know its working process.
Steps to Import EML to Exchange Mailbox
Step 1. Install and launch the Xtraxtor on your Windows OS system.
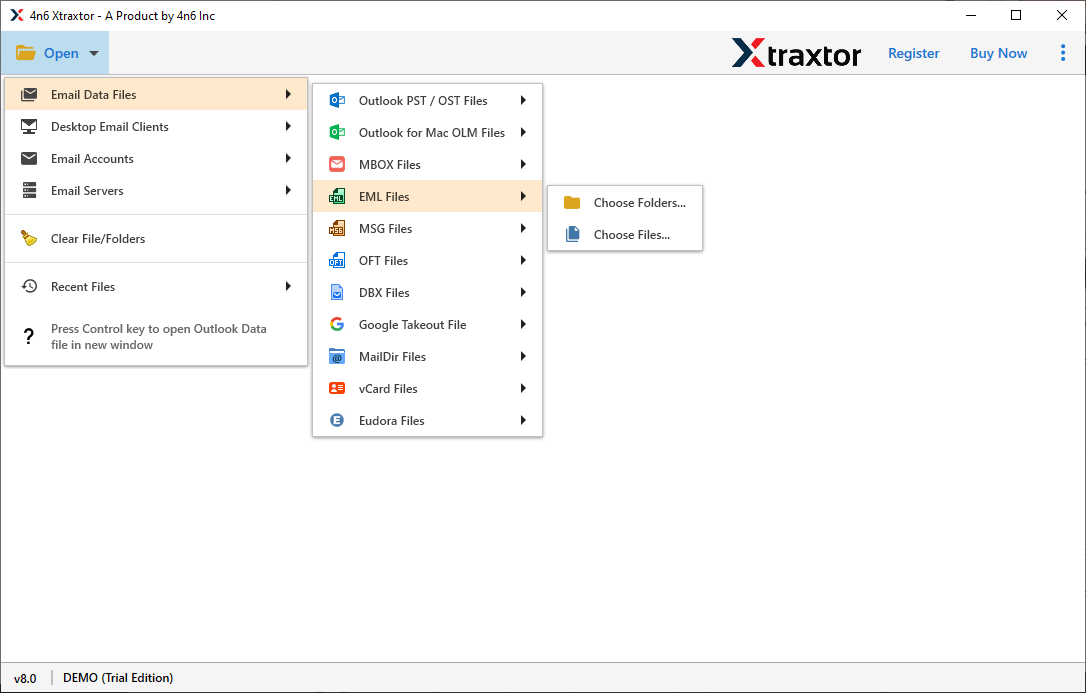
Step 2. Now select Open >> Email Data File >> EML Files >> Select File or Folder.

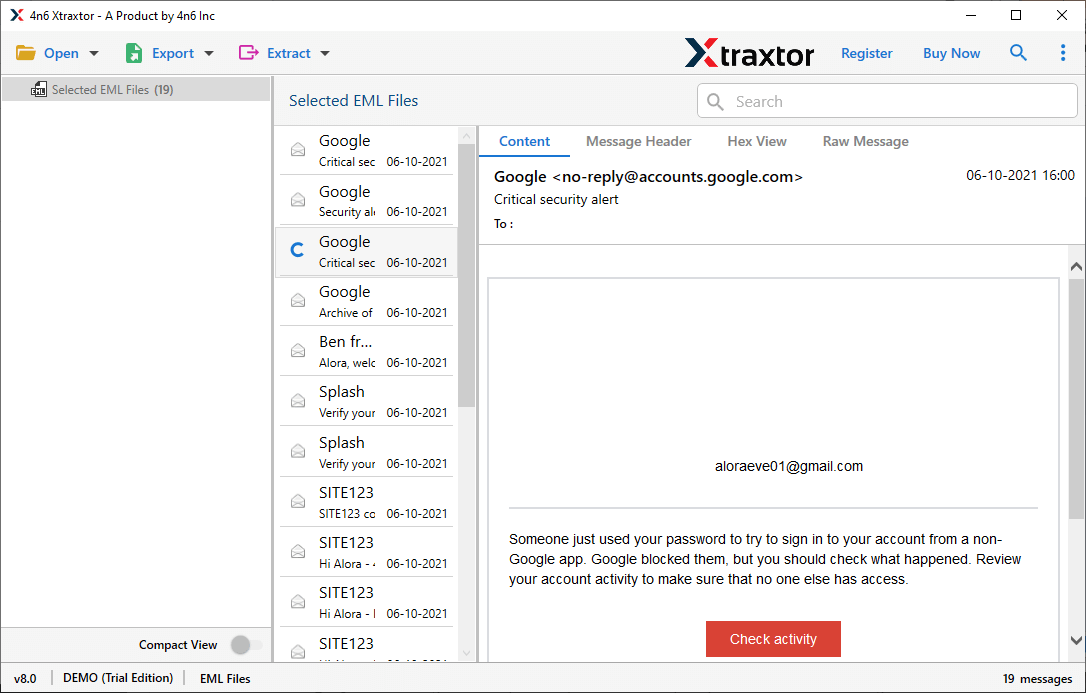
Step 3. Here you can view all your emails from the uploaded file.

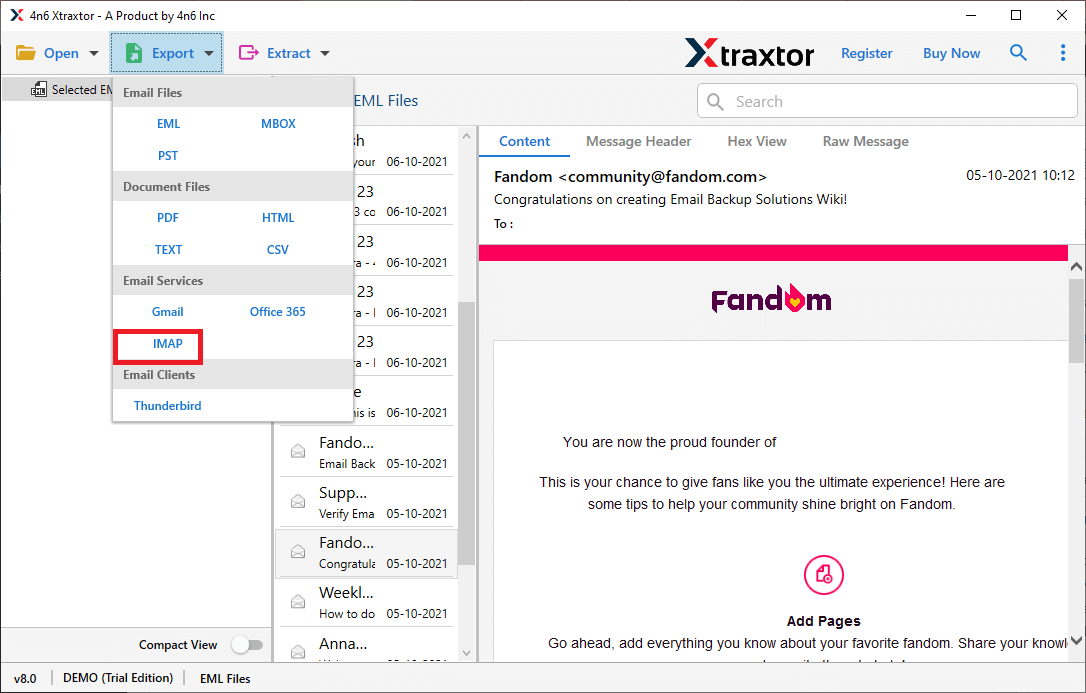
Step 4. Then click on Export and choose the IMAP option.

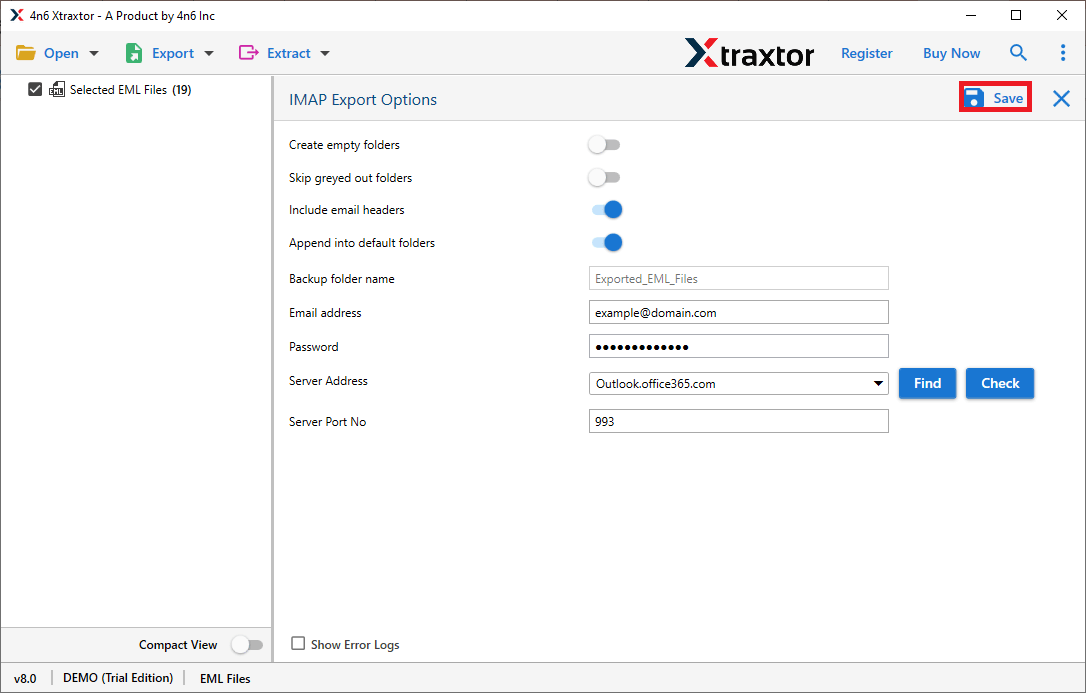
Step 5. at last, enter your Exchange online login details and hit on the Save button.

Done! Using this tool you successfully import EML to Exchange Online in a few simple clicks.
Benefits of Using EML to Exchange Import Tool
There are the various outstanding features of this tool that efficiently and accurately upload .eml files to Exchange mailbox without data loss.
- Directly Move EML File to Exchange: This tool allows you to instantly transfer .eml files to Exchange Online without any hassle. You just need to add data files and enter your Exchange Online login details and done. It will automatically move .eml file to your mailbox with ease.
- Bulk EML Import: With the dual mode of this tool, you can transfer unlimited EML files to Exchange mailbox in a single attempt. Either you can select EML files or Choose Folder and import EML to Exchange in batch.
- Transfer EML to Cloud Server: Using this tool you can perform multiple migrations in a single interface. It will import EML to Yahoo, Office 365, Gmail, iCloud, cPanel, and other webmail accounts.
- Support EML from Multiple Sources: This Email Converter tool can import EML files created by different email applications. It supports EML files from Thunderbird, Outlook, Entourage, Apple Mail, IncrediMail, Windows Live Mail, etc.
- Support Windows OS: The EML to Exchange Import tool can easily run on all Windows systems. You can install this utility on Windows 11, 10, 7, Vista, XP and all other previous versions without any technical issues.
- Different File Saving Option: Along with EML to Exchange migration process, this utility can save emails in different file formats. Use this tool and convert EML to MBOX, PTS, PDF, HTML, etc.
- Filter Options: If you want to import .eml from a particular sender, then you can apply thr “from” or “name” filter and import only those emails. Along with that you can also apply different filter options such as – to, from, cc, bcc, subject, time, date, has attachments, etc.
Conclusion
In this post, we address the query – How to import EML to Exchange Online account and describe the best way to perform the import. The automatic tool allows you to transfer single and multiple EML files to an Exchange mailbox in a few simple steps. You can use the trial version of the tool and perform the import process.
Frequently Asked Questions
Q1. Why should I import EML files to Exchange Online?
Ans. Importing EML files to Exchange Online keeps your emails safe, organised, and easy to access in the cloud. It also helps you manage emails better and use them with other Microsoft 365 tools.
Q2. How secure is the migration process?
Ans. The tool will migrate your EML file data into Office 365 securely. While migrating, there will be no data loss.
Q3. Can I migrate emails in bulk?
Ans. Yes, the tool allows for the migration of multiple email file messages to Office 365. Most importantly, there will be no data loss.
