If you are trying to import EML to Gmail, you might have already noticed that Gmail does not allow direct EML uploads. Still, there are a few reliable ways to move your EML emails into your Gmail account without losing formatting or attachments.
This guide explains why users shift EML to Gmail, how the manual method works, and what to do if the manual steps do not work for you.
Before moving ahead, let’s first understand the reason why Gmail doesn’t support importing EML files. So that you have a better clarity on the issues you were facing while importing EML files into Gmail account.
Can Gmail Open EML Files?
No, Gmail cannot directly open EML files. If you try to upload an EML file into Gmail, it won’t display the email properly. Gmail only shows EML content correctly when the email is already stored inside your Gmail account.
To view an EML file in Gmail, you must import or upload the EML file using a method such as Windows Live Mail or an automated EML to Gmail import tool. Once imported, the emails will appear normally inside your Gmail inbox or folder, and you can open them just like any regular message.
Now, let’s move into the methods to see how to import .eml to Gmail account.
How to Import EML to Gmail Manually?
The manual process uses Windows Live Mail (WLM).
You must:
- Import EML files into WLM
- Add your Gmail account to WLM
- Drag and drop EML emails into the Gmail folder
This method works, but it takes time and depends on older software.
1. Open Windows Live Mail on your computer.
2. Go to File >> Import Messages.
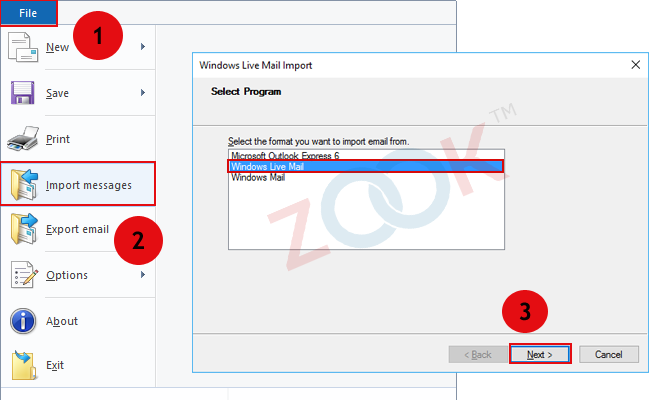
3. Choose Windows Live Mail as the format.
4. Browse and select the folder that contains your EML files.
5. Click Next, then finish the import.
6. Go to the Accounts tab >> click Email.
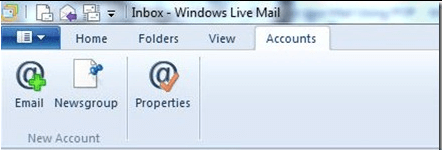
7. Enter your Gmail email and password.
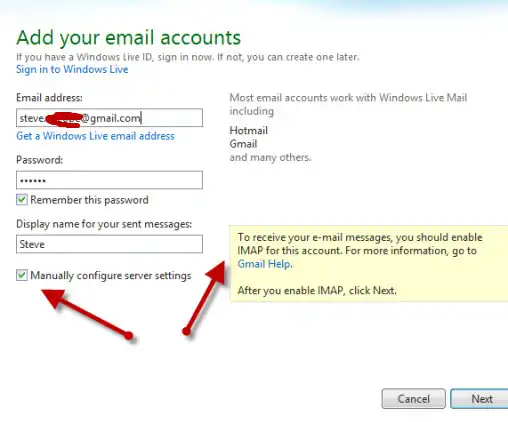
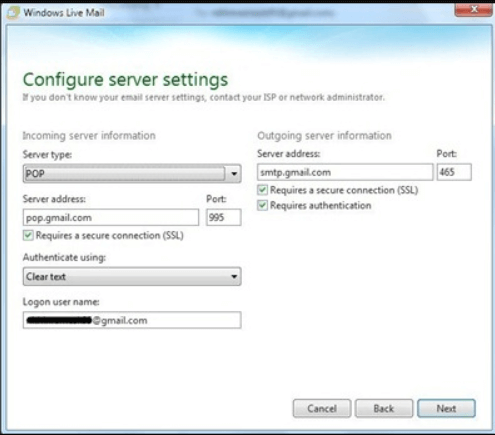
8. Select Manually Configure Server Settings.
Use these details:
- Incoming (POP):
- Server: pop.gmail.com
- Port: 995
- Outgoing (SMTP):
- Server: smtp.gmail.com
- Port: 465
9. Click Next, then Finish.
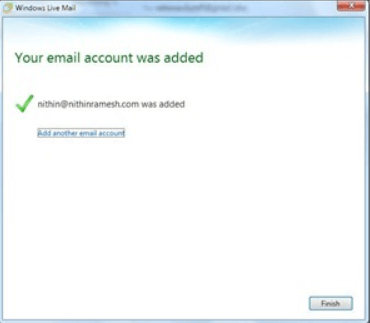
10. Once Gmail appears inside WLM:
- Open the folder containing imported EML files.
- Drag and drop the emails into your Gmail inbox or any Gmail folder.
Your EML files will sync with your Gmail account.
Limitations of the Manual Method
The manual method is free, but many users face issues:
- Windows Live Mail is discontinued, hard to install, and buggy
- Not suitable for bulk import
- Attachments may fail to sync
- Gmail may not sync if IMAP or Less Secure Apps is blocked
- The process is slow and confusing for beginners
- Requires old software not available on most modern Windows PCs
Because of these limitations, users often prefer an automated tool, especially if they have many EML files or need a faster, error-free method.
How to Open EML Files in Gmail Securely?
If the manual process feels too long, doesn’t work on your system, or you do not want to install outdated software, you can use an automated tool. Xtraxtor EML Converter is one such solution that can effortlessly complete the importing process without any hassle.
This tool can easily upload EML files to Gmail in easy steps without losing attachments or email structure. Instead of relying on complicated manual steps or email clients, Xtraxtor handles the entire import automatically. So that anyone can move EML files into Gmail and access them instantly from any device.
Tap on the free download button and check its complete working process.


Steps to Import EML to Gmail Account
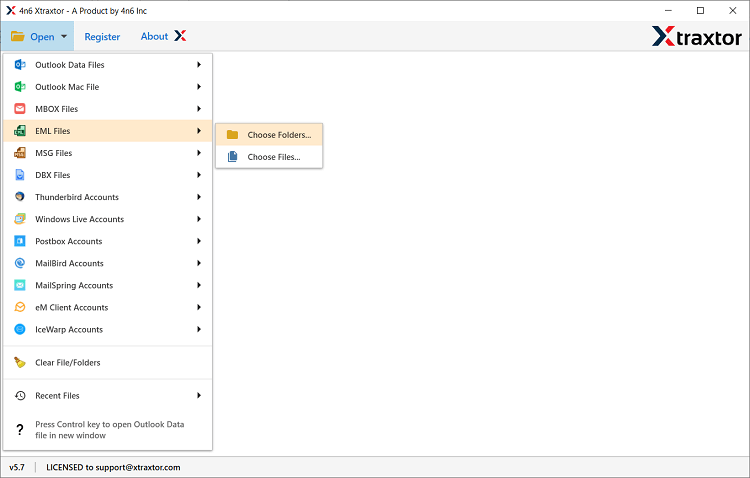
- Install and run the Xtraxtor on your computer.
- Click on Open >> Email Data Files >> EML Files >> Choose Folders or Files.
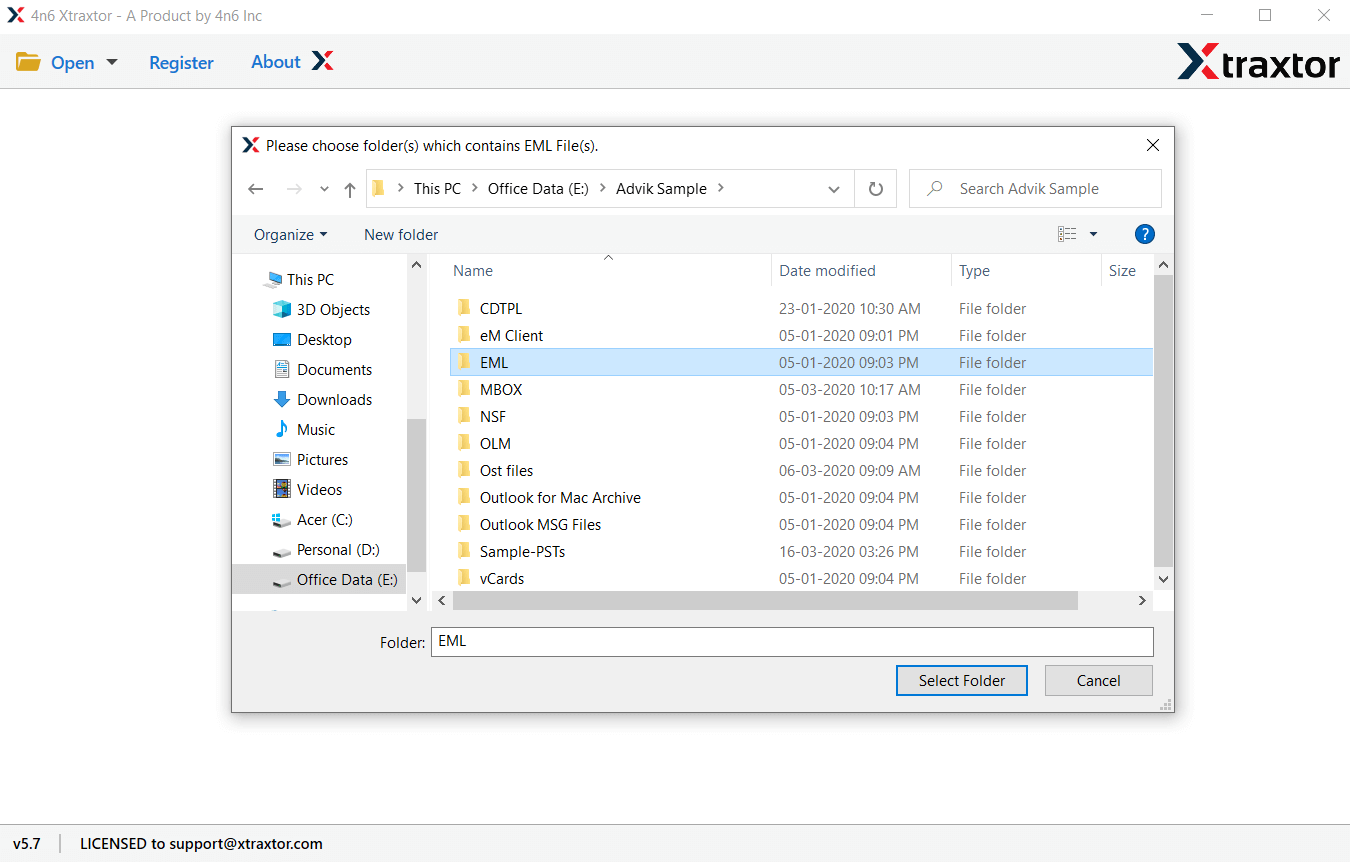
- Select a folder having .eml files.
- Click Export and select Gmail from the saving option.
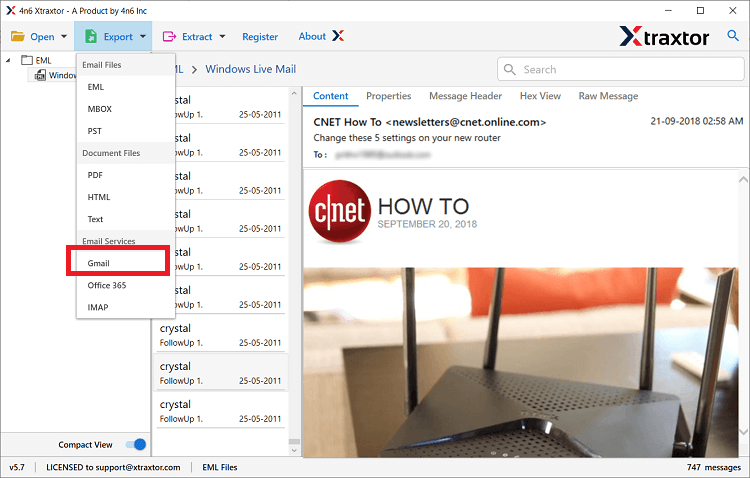
- Enter your Gmail account credentials and click the Save button.
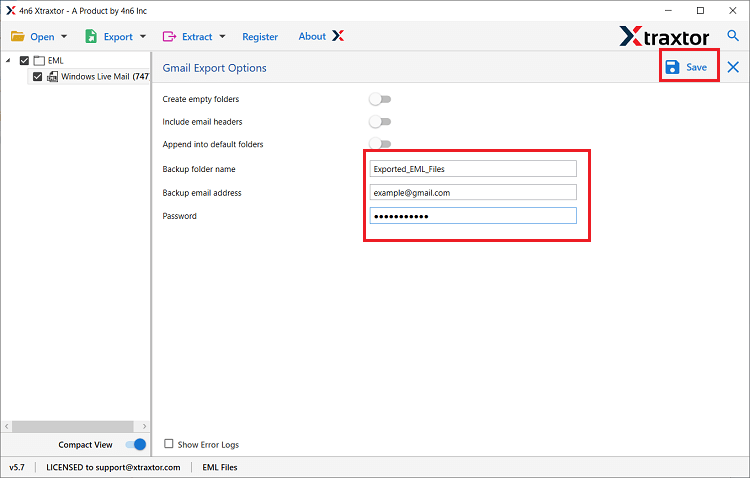
Done! This is the simplest and most successful solution to import EML to Gmail account directly.
Why Choose EML to Gmail Converter?
This wizard has many useful features that make this task easier for the users. In the following section, we are going to discuss some highlighted features of utility in detail.
- Easy to Use: The software has a simple and graphical user interface. Beginners can also import EML files to Gmail without any issue. Regardless of whether you are technical or not, the tool does not require technical knowledge to perform this task.
- Cloud Migration: With the help of this tool you can also import EML to Office 365, Yahoo Mail and many other webmail accounts.
- Bulk Conversion: The utility grants permission to import EML to Gmail in bulk in a single time. In addition, the software is not subject to any restrictions. You can easily perform unlimited EML file migration without data loss.
- Data Extraction: This tool also extract attachments, email addressee, phone number and other data from EML files. All the extracted data will be save in a single text file.
- Preserve Data Integrity: The software maintains the data integrity of EML files during the import process. The metadata properties are retained even after the import EML to Gmail account process.
- Different Saving Options: Using this software one can also convert EML to PST, MBOX, CSV, PDF and many other file formats. All these file-saving options will be present in a single interface.
- Selective Email Conversion: The tool previews EML files after loading them in the software panel. Here you can select the EML files that you want to import into a Gmail account and save your time.
- Save Emails with Attachments: This utility supports to import EML files to Gmail account along with their attachments. You do not have to import the attachments from EML files separately, the tool imports attachments that are linked to email messages.
- Windows Supportive: It is completely a Windows-based utility that can be easily installed on Windows 10, Windows 8.1, Windows 8 and other editions listed below.
Frequently Asked Questions:
1. Can I upload multiple EML files to Gmail at once?
Yes. Using an automated tool, you can import hundreds or thousands of EML files at the same time.
2. Attachments are important to me. Will they be transferred?
Yes. Both the manual and automated methods support attachments, but automated tools handle them more reliably.
3. Can I import EML files from Thunderbird into Gmail?
Yes. EML files created by Thunderbird can be imported into Gmail using both methods.
4. Do I need Outlook or Windows Live Mail for the tool-based method?
No. The automated method works independently.
5. Once imported, can I access my emails from any device?
Yes. After importing, your emails are stored in Gmail and accessible from mobile, laptop, or tablet.
Conclusion
Importing EML files into Gmail is absolutely possible. The manual method works but requires old software and several steps, which can be slow and confusing for many users. If you have fewer emails, you can try the manual way. But if you want a faster, easier, and more reliable method, an automated tool is the better choice, especially for bulk EML files or when attachments and formatting matter.
Choose the method that fits your needs, and you’ll be able to import EML to Gmail account.
